Showing posts with label Halloween. Show all posts

Monday, 12 November 2012

2012 Costume

Hello there! It's been about a month since I've posted anything. What can I say...not much has been going on house-wise, I was in a bit of an adjustment period at work that left me exhausted every night and I've felt a lack of inspiration and drive lately.

But, onwards and upwards!
 
Obviously, this is extremely late, but I just wanted to throw a quick post on here so that I can take a look back next year when I'm scrambling for a costume idea.
 
I've had this idea doggy eared in a magazine for a couple of years now and finally had a reason to make it:
 
Pinned Image
 
 
Our staff was having a costume contest but I didn't have much time to devote to it, so I got out my glue gun, a bunch of spiders I had in my Halloween bin and bought some nude nylons...
 
Photobucket
I was trying to get both the spiders on my leg and on my shoulder into this picture, hence the uber-pose.
 
Photobucket
I had more spiders crawling up my arm, but many fell off on my way home from work as I put my coat on.
 
Photobucket
 
So fun, easy, quick and cheap!
 
The original cockroach version is creepy, but just too close to home for me after a year of being terrorized by them while living abroad for a year, so I opted for spiders instead.
 
I have a couple other posts that I've been working on that are also long overdue, so I will be back in a couple of days!
 

Monday, 15 October 2012

Looking Boo-tiful

Hello!  I hope you've had an enjoyable weekend.  I attended a low key bachelorette party where we went for mani/pedis, thai food and then made a time capsule for the bride and groom to open on their 5th anniversary.  The day was wonderful.  The drive home was scary.  The rainfall was very heavy, I hydroplaned a couple of times, my antilock breaks went on when I stopped, one of my headlights was out (I was driving home at midnight for about an hour and a half long drive), the fog in some of the areas was so thick I had to pull over, stop, and talk myself into going a little further.  I was very glad to finally pull into my driveway and get out of the car! 

On sunday, I went for a little family walk with my sister, brother-in-law and baby Lily, watched a movie and then actually cooked a decent meal from scratch (a rare occurance for me, but something got into me and I felt inspired to create!  lol)

Anyhoo, I'm not much of a seasonal decorator - Holidays, yes! - but seasons, not really.  I appreciate all the lovely pictures I see of beautiful Fall decorations, but I don't have the drive to do it myself.  But when the holidays come, I love to do a little something to get in the spirit.

Last weekend I got out my Halloween bin and put a few things together.  I used the the decorations I got on clearance last year at Michaels and got the living room set up.


Photobucket
 
The feathers are from a centerpiece at a wedding we were at last year, the hurricane was a wedding gift and the glass stones I normally have in there with a white candle.  So I put in the black candle, the orange tea light holder, the ceramic skull and scattered some little spiders around.
 

Photobucket
 
I love classic orange and black for Halloween, so my orange vase and some more black feathers went well together

Photobucket
 
And then the doily spider webs I made last year, I hung from the curtain rods.

Photobucket

I put a few things up outside, but nothing to write home about, so if I add a few more I'll snap some pictures.

Are you getting your Halloween decorations out?  Do you like seasonal or holiday decorating?

Friday, 25 November 2011

Goodbye Dusty Rose...

When we first moved into our house, long before any demo, our living room was where we spent most of our time.  Here are two pictures of our first night (hence the pizza box and and my work bins all over the couches)  But the important things to note here are, in fact, the couches.


We call her Dusty Rose


Tons of seating space right??

Fast forward two years to this Halloween...my sister, bro-in-law and my parents decided to come to my house to hand candy out to the wee ones.  Here's how the living room looked before they arrived...


The problem?  No where to sit!  My family is often over, so I wasn't worried about the mess on the floor, that could be (and was) easily pushed to the oppsite side of the room, but I did want somewhere decent for them to sit.  I figured since the walls were all painted, the floors were all down, maybe I could actually start to bring some furniture out of storage!  Darryl was away for work, so I asked my dad if he would mind giving me a hand when he came over.  Before everyone arrived, I went into the mudroom where the couch had been stored for over a year to clear a path and tear all the protective plastic dust-covering drop cloths off. 


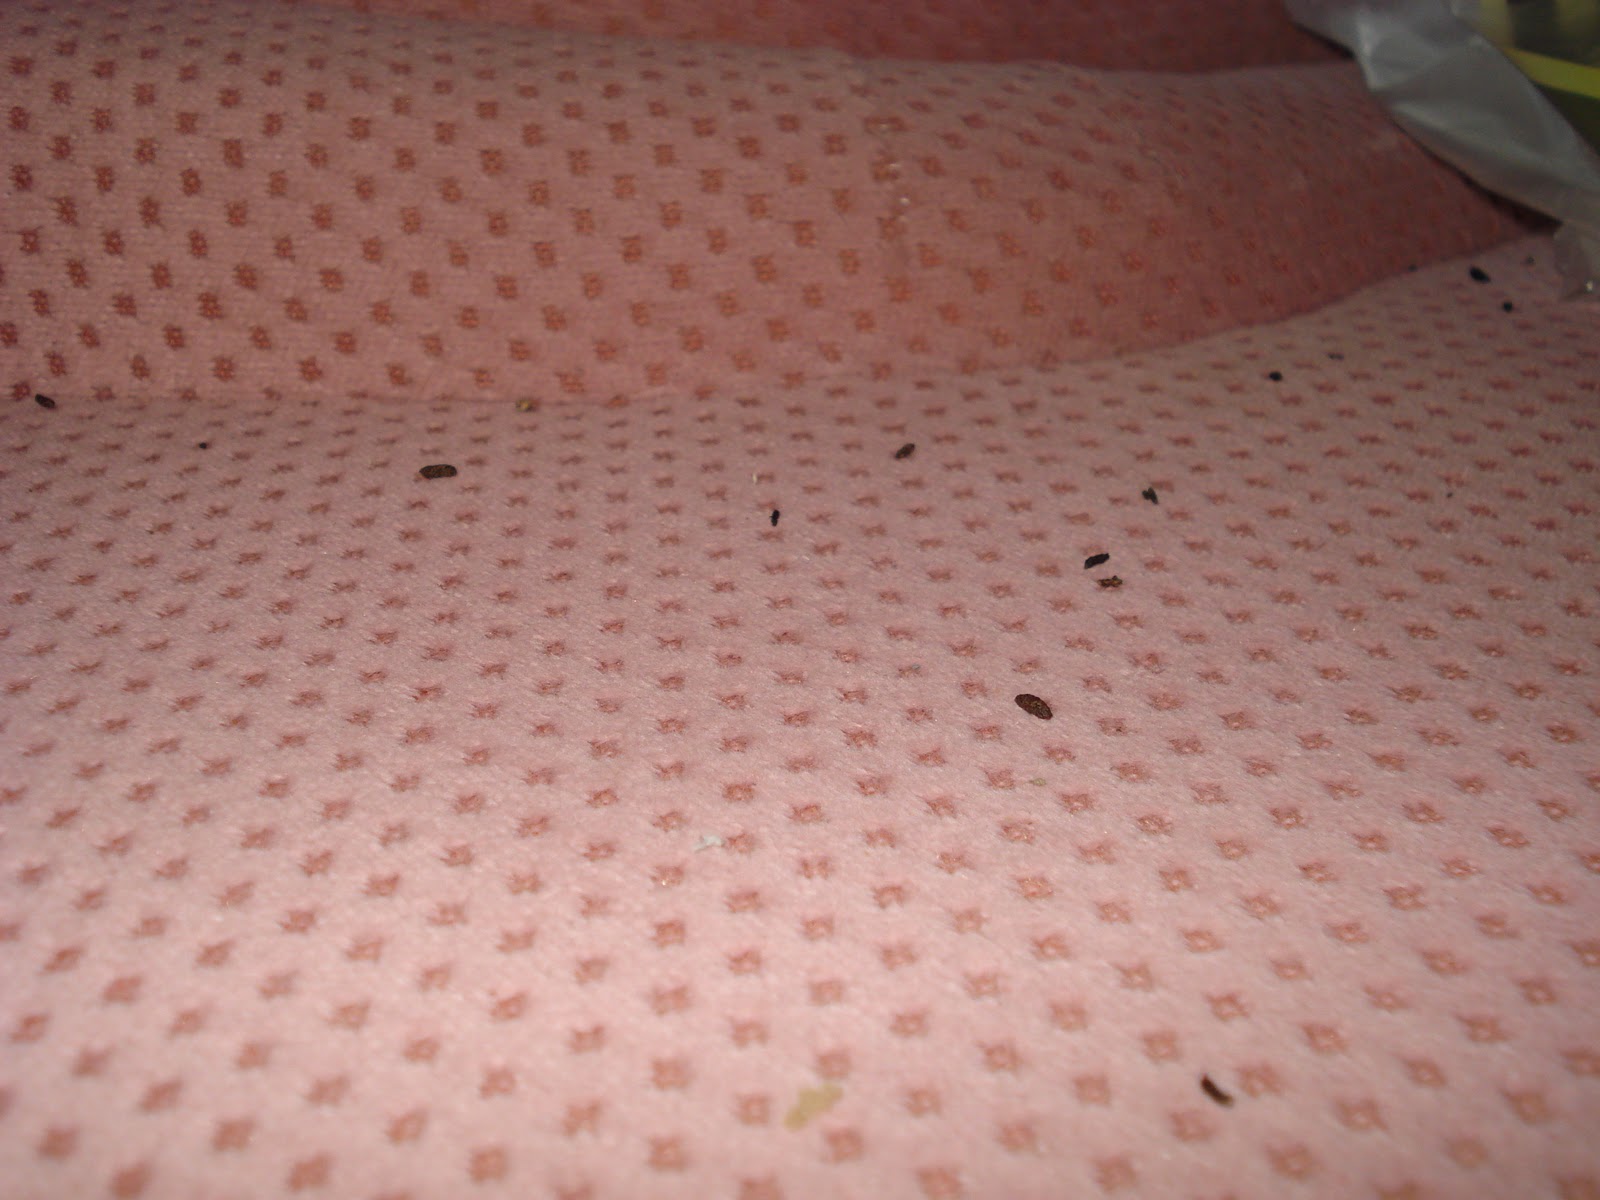
I thought I'd get a head start and at least bring all the cushions in.  After lifting a few up, this is what I saw...


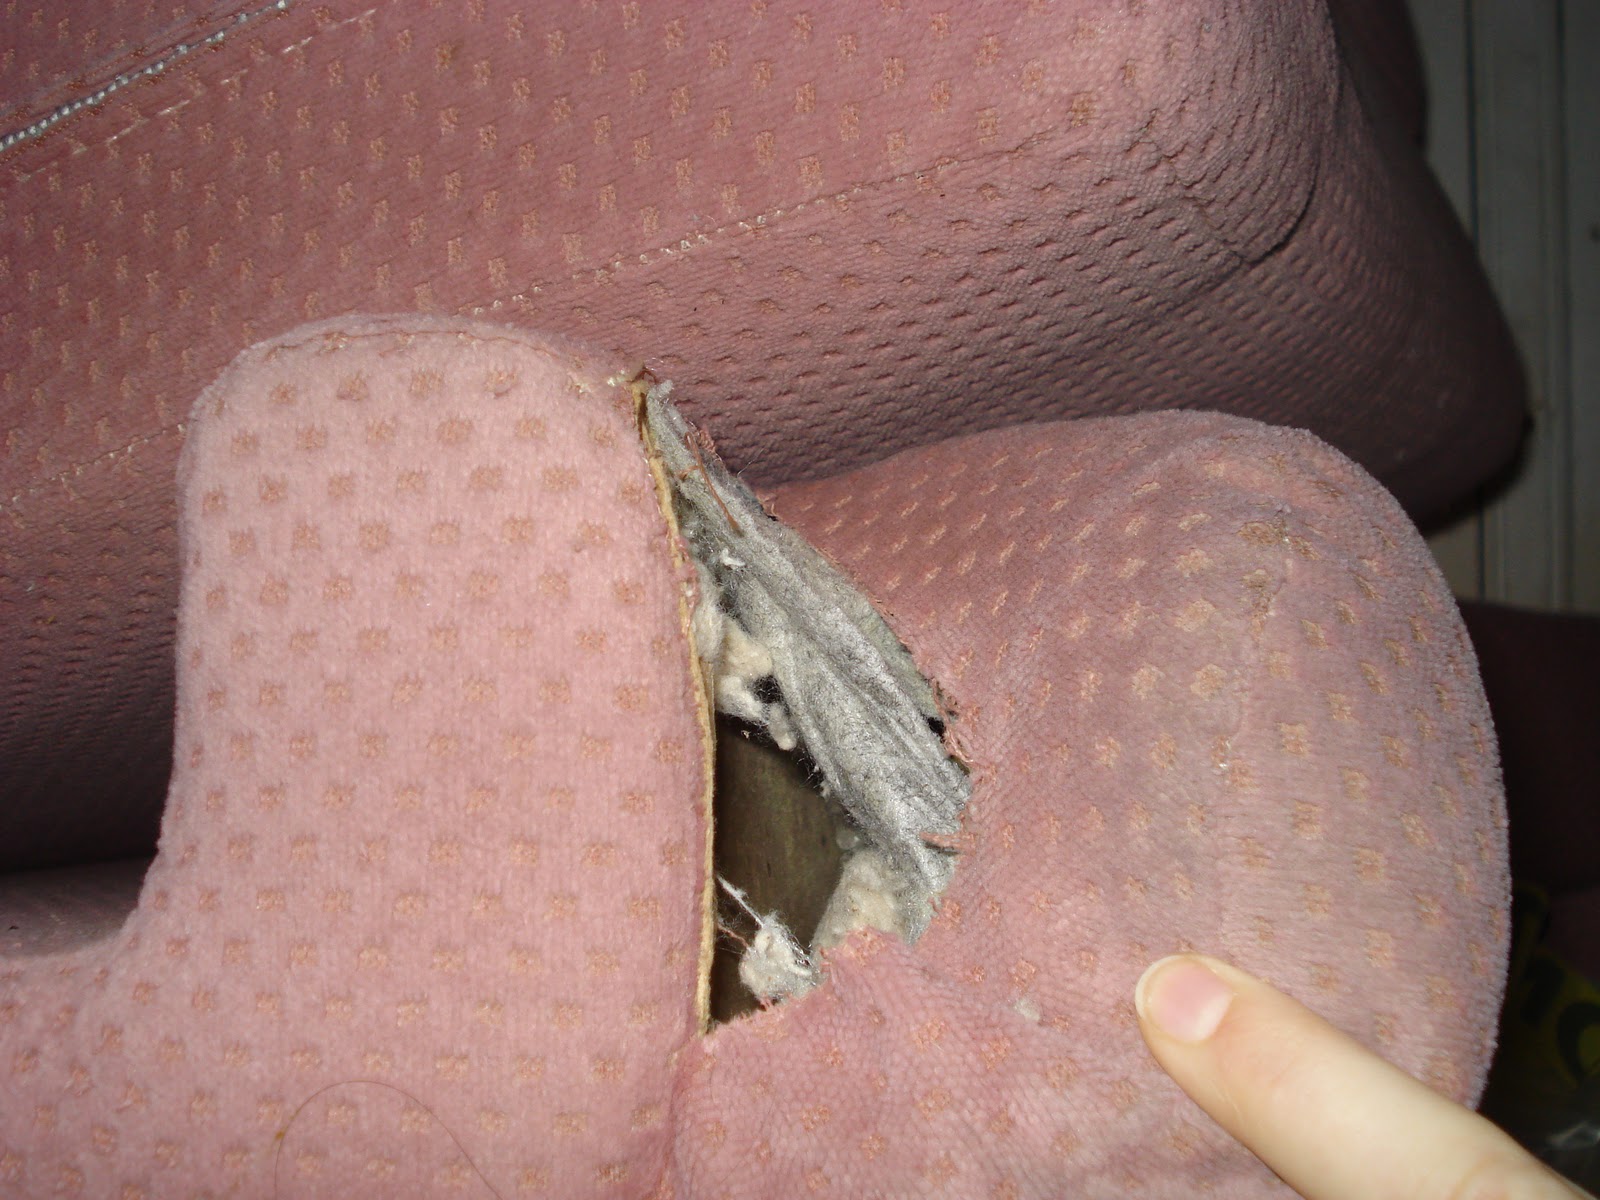
HORROR!!!!!!!!!  Apparently our 91 year old mudroom is not mouse proof and last winter they must have sought haven in our couch arms.  At first I thought they'd just gotten warm under the cushions - that would be manageable with a good clean.  But after a closer look I saw this...


Clearly they have tunneled and nested all the way inside the couch!  Needless to say I opened the door to my family arriving on Halloween with tears in my eyes for several reasons:

1.  We would have to buy a new couch... $$$$!
2.  I wanted a nice, comfy (albeit pink) place for my family, and preggers sister, to sit!
3.  Only one or two short months prior to this I had convinced Darryl to put the old black leather couch to the curb as it had suffered during much of the demo phase.

How did we go from 2 couches to none!?

Luckily my family worked with me and we all enjoyed our night, despite being sat on various camping chairs, stools, benches and kitchen chairs.

While we never loved the look of our inherited pink couch, it offered a heck of a lot of seating space, and it was pretty darn comfy.  We did not think we would be buying a new couch for a good year or two.  But after clearing our family out of hand-me-down couches, we realized we were going to have to bite the bullet much sooner than we had anticipated.

Last weekend we spent a day shopping at all of the usual stores, Leons, the Brick, United Furniture, to name a few.  I learned that 1. couches are pretty expensive, and 2. man those stores sell a lot of dated-looking couches!  Nothing in our price range suited our style, so we headed down to IKEA, and the couch gods must have been watching over us because it was the last weekend of their couch sale!  Buy one get one 50% off!

I had been loving on the Karlstad series for some time (or as Darryl calls it "Karl's Dad"), I like the straight lines they have.  Darryl wasn't sure about the quality, sturdiness and comfort, so we decided to go do a little sit-test.  We loved it!  So we bought a love seat and chaise lounge attachment...and then found out the chaise lounges were out of stock.  So we had to drive back later this week to pick it up, but hopefully we'll have an assembled couch to share soon!

Have a lovely weekend!!

Any couches in your future?  What do you look for in a "good" couch  (price, style, comfort)? 

Monday, 7 November 2011

How Much Is Too Much?

Halloween has been done and done again, but when I was at Michaels for some supplies this weekend to finish my benches off (which I didn't end up finding), I passed by the Halloween clearance rack where everything was 60-90% off...I couldn't resist!  Here's a few things I picked up for next year...

Two black and purple tea light candle holders (originally $9.99 each, but I picked them up for $1.99 each!)


Some black and orange tea lights to go in the holders, each package has 8 candles (originally $1.50, on sale for 30 cents per pack!  That's like 3 cents a candle...crazy talk!)


A lovely 6 inch black pillar candle (originally $14.99, picked up for $2.99)


And this little white ceramic skull (originally $5.99, on for 69 cents!  Amazing!)


I promise that's the last of the Halloween talk, I should be on to Christmas by now, right!?

Come on back tomorrow for the low down on how I made my benches!

Did anyone else get some clearance goodies?? 

Friday, 28 October 2011

Spookified!

When it comes to Halloween decorations, I guess I'm a bit more traditional.  I like all the things that remind me of my childhood - things I would see while Trick-or-Treating or things we would decorate our own house with.  I don't go over the top (mainly because our first halloween we had 2 children come to our house.  Then last year we had I think 12 kids) So it's a lot of effort to go to, when so few kids are around to enjoy it.  But I'm hoping that we'll get more kiddies each year and then I'll add to the decorations accordingly. 

I like cobwebs.  But last year I got so sick of the usual dollar store ones.  The kind you stretch out really thin and stick to the bricks on your house.  They were constantly blowing off the house and, is it just me, or are they making them with worse and worse quality?  Last year they wouldn't even stretch out without breaking apart in chunks.  Very frustrating.  So this year I spotted an idea in the Martha Stewart Halloween magazine that I thought I'd try out... 

I can't seem to find the picture of the porch that inspired me, but it's in her 2011 Halloween magazine if you're curious...


The tree in the above picture is the reason why I can't get a straight-on picture of my house.  The tree is dead centered on the house and goes all the way up to the second floor.  It's nice for privacy, but not so much for picture taking.

I think I'm going to stick to this web from now on!  It makes for much easier clean up and I like that it's reuseable, so that I won't have to spend money on new cobwebs every year.  And then I just may add some more of these webs for different parts of the porch as the years go on. 
Last year my sister and I took on a spider sac craft from Martha (See Martha's version here).  Using dollar store white tights, we stuffed them with cobwebs and baby spiders and glue gunned bigger spiders on the outside.


(woops!  Forgot to declutter the porch for the pic!)


A friend of mine bought me this awesome spider that is the perfect size for my new web, and it has little purple lights that flash when you turn it on for the big night!


 Inside the house I have my doily webs decking out my windows...


I had this orange vase and these black feathers so I put them together for a traditional Halloween colour scheme.  Then I saw both Sherry at YHL and Kerry at First Time Fancy do a little decorating with things they already had at home....books!  I have a bookshelf here and so I thought maybe I could try my own combo out...


I chose books based on their colour, I wanted to keep the black and orange going, and I tried to find ones that also had a spooky-ish title.  "The Art of Zombie Warfare", makes sense...."Where's Mom Now That I Need Her?"...well, it was orange....and if there was ever a zombie warfare, I'd definitely want my mum around.  And "Almost", it was black.  And maybe we only "Almost" survived the zombie warfare??  Ok maybe I'm reaching...but I like it!

I had to throw the cheesy pumpkin candle holder in there and a little white candle to go with the white book.  I enjoy! 

I didn't make these this year, but here's some fun Halloween treats I've made before


Apple slices and almond teeth


Hot dogs wrapped in tortillas with bloody ketchup nails (which I would never eat because I think ketchup is disgusting, but if you don't, give them a whirl!)


Carrots with almond nails in spinach dip


So there you go, just a little Halloween decor around here...I've already got a few things I want to make next year to add to it all!

***update, we had 32 trick-or-treaters this year, more than double than last year!
Are you into decorating for Halloween?  Do you like to make your own decor?  Any fun treats you make?

Wednesday, 5 October 2011

Doily Webs for Halloween in 5 Easy Steps

Thank you to all who popped on over yesterday after my guest post at First Time Fancy, and for all your welcoming and encouraging comments!  It was great to hear from bloggers that I've been following for a while, as well as to meet some new ones!

Last week I was rifling through some magazines at the check out at Home Depot and I came across a cute and easy Halloween craft. 


I logged it in my mental files and this weekend I set out to get the few materials I needed.  Here is everything I needed (I didn't end up using the sparkles in the end)


- Sand paper/block
- Cross stitch hoops (I got this set of three from Value Village all for $1.99)
- I scored 12 doilies from another local thrift shope all for $3!!   I only used 3 for this project but I have plans for the others
- Dollarama spiders for $2 (I only used 3 of the 8 I got so I'll have to think of some more crafts for the left overs)
- Black spray paint $4.99 and it was 40% off on top of that with a coupon I had for Michaels - I never go to that store without a coupon
- Pompom string marked down to $1 at Michaels
- Glue $1

And here's how...


Step 1: I gave the hoops a light sand just because I have texture issues and don't like the snaggly prickling feeling that wood can sometimes have.

Step 2: Give the hoops a few coats of black spray paint (or any other colour really, I thought about a deep purple for a bit but decided against it in the end).  I covered the pins that tighten the hoops at the top with saran wrap, because I didn't have tape on hand.  I did that because I didn't want the pins to have trouble opening or closing from tacky paint.


Darryl put a few nails for me to hang the hoops on for spraying.  And as this part of our house is clearly not a keeper, we didn't mind getting paint on it.


Step 3 (optional): While my paint was drying I threw the doilies in the wash on the handwash cycle because I don't prefer Eau de Old-Lady-Powder as a fragrance in general.  If this scent floats your boat or brings back some nostalgic memories, just skip this step.  My Nana does not smell like this so I went for the wash.

Step 4: Once your paint is dry, loosen the pin at the top to take the outer ring off completely or just to loosen it, whichever you prefer.  Lay your doily over the inside hoop and centre the pattern.  Place the outer hoop over the doily and push it down so that the 2 hoops are now flush.  Before you tighten the pin, gently pull any loose pieces.  When you're happy with the placement tighten the pin.  Trim the excess material.

Step 5: Use ribbon or string, or even fishing line if you want them to look like they're floating.  I was going to use black ribbon, but once I saw the pompomed string I liked the extra texture and interest it gave.  Whichever you choose, tie it to the pin on the hoop.  You could glue gun it on too but I wanted to be able to take them off and adjust their length from time to time.  Finish it off with a spider on it and you're done!  Again you could glue the spiders on, but I just tucked their legs through the holes in the doilies so that I can move them or change them up if I like.

Sorry for the lack of pics in the last couple of steps, once I got started, I got carried away and before I knew it, I had them hanging on my windows with not a picture in sight.  But here's a few with them all done...


and at night...


And there you go, very little materials, no time at all and you get a cute little window or wall display for Halloween!  And even better was Darryl's reaction when he came home and saw them.  He really likes them.  Once the hoops were painted and dried, it took less than 10 minutes to assemble the hoops and have them hanging in my window.


Total Cost: $10 for three pieces with so many left overs for future projects.  I'm happy with that!

Are you getting your Halloween craft/decor on yet?  I can't help myself as soon as October hits.