Showing posts with label Befores. Show all posts

Monday, 14 October 2013

Bathroom Demo


This post isn't pretty so I'll keep it simple.  Demo started with the fixtures coming out...
 
 photo DSC04670_zps65ff64d8.jpg

We are keeping the toilet because we upgraded it to an eco friendly one when we re-did our main floor (full disclosure: the seat lid got ruined during demo so that part will have to be replaced)

We are keeping the tub on hand because we can't bear to part with it and have hopes to one day incorporate it into our "forever home".  I would love to have a shower and this tub just for bathing.  But as far as having it as your only method of shower, it was not practical or enjoyable for us.  It was like suffocating in shower curtains that stuck to you like magnets, no where to put your soaps and shampoos (yes we had a rack that straddled the tub but that didn't stop things from always falling off).  The main reason though, was that this baby's enamel had worn off.  To give you an idea, here is a picture of it immediately after a thoroughly aggressive scrub-down:

 photo DSC04651_zps7a0d3290.jpg

The sides are fine, but take a closer look at the bottom...

 photo DSC04658_zps83431081.jpg

Ladies, how does one leave a shower (nevermind a bath!) feeling truly clean in that!? (mhmm, I showered in flipflops).  Yes, it could be refinished, that's why we're holding on to it for now, but it was a budget breaker for us at this point.  So it was removed...

 photo DSC04680_zpsbc4360fd.jpg

Just cause I was curious...Made in Toronto

 photo DSC04675_zps547579a5.jpg

You know how they say things get worse before they get better?  This was what was behind the tub...

 photo DSC04682_zps8aa4a36a.jpg

Pa-ukkkkkkke!  Pretty sure that is some mould  :S

 photo DSC04684_zpsbd15a424.jpg

While we're on the topic of grossness, when we took the tub out, we found this...

 photo DSC04673_zps6ff5cba5.jpg

That, my friends, is a Christmas glass half filled with cigarette butts.  Like whhhaaaat!?  WHO was smoking in the bathroom and hoarding their old butts under the tub???  The people who lived here before us continue to amaze.

And since I'm past the point of shame now.  This is nast, but at least somewhat expected.

 photo DSC04677_zps09f0d6e8.jpg

Once that was all taken care of, I taped everything off...a feeble attempt at keeping the dust contained.

 photo DSC04690_zps1b02f47f.jpg
 
Covering the demo process could easily take up a few posts, but I think that could get boring pretty fast so I'll give you the Coles Notes instead.
 
The floor came up...

 photo DSC04691_zps860b1b7d.jpg

The walls came down...

 photo DSC04688_zpsd74c3378.jpg

The plumbing was exposed...

 photo DSC04692_zpsb6c74716.jpg

Et Voila...  a demoed bathroom!

 photo DSC04694_zps50f2554a.jpg
 
 
If only the process had been as quick as that  ;)

Here's to things going from worse to better!

In a couple of days I'll show you why our projected one-day-demo plan turned into 3 days.

Tuesday, 27 August 2013

There's No Turning Back Now

Family and friends!  It's been over half of a year since I've posted anything, for no good reason other than I've had nothing to post about.  But as of last Thursday the beginning of July (I even procrastinated publishing this post for nearly 2 months!), we have officially started our next renovation and finally have something to post about.  Since you aren't all nearby to see each stage, you can follow along right here if you like!

If you remember our updated goals for this year, we're finally getting around to #1 on our list - the upstairs bathroom!  In that post I listed the many, many, mannnnny reasons that this room needed to be redone so I won't revisit that now.  I'll just show you a few pictures to jog the memory and knowledge that it.needs.to.be.done.

 photo DSC04631_zpsbf7af220.jpg
 
 photo DSC04643_zpsd888815e.jpg

 photo DSC04634_zps141da348.jpg

 
So last Thursday in the first week of July we got to demo (thanks to Darryl's Dad who devoted a few hours of his day to getting us off on the right foot!), and demo continued for another three days.  Who'd have thought that one tiny little room would take more than the 1 day timeline we had originally projected??  Ha!  Out of curiousity I just had a scroll through some of my first posts from when we demoed our entire main floor and saw that we hadn't entirely remembered the lesson we had learned the first time around: when you're DIYing, things always take longer than expected.

 photo DSC04635_zpsa0802817.jpg
 
 photo DSC04639_zps52d17f68.jpg

So Thursday (July 4th) morning I had my last shower in that bathroom.  It was my last bonding session and farewell to that poor little guy (and my last chance at a half-decent shower).  That evening, there was no more bathroom up there...

I'll share the demo pics with you very shortly - and if I can stand it, I may even show you where we've been showering for the last 2 months *shudder*.

Have you done any demo recently?  Knocking anything off of your to-do list?


Friday, 4 January 2013

2012 List Revisited / 2013 Goals

Hmm.

Remember back in January when I did up our list of 2012 Goals??  Mhmmmmm...well I just had a look back at them and realized we have not come close to even starting any of them.  Shame!  Back when I wrote them up we hadn't yet been engaged.  Planning a wedding in six months kind of put everything else on the back burner and redirected our funds.  And now it's January and Darryl has gone back to school for a 2 year program and somehow I don't think we'll be getting to either of those projects until after that.

Well, maybe we'll get around to the porch next summer.  But I'm not making any promises.

Instead, we've refocused on a couple of smaller-scale and more manageable projects.  These still won't start until summer when Darryl is done school for the year, but here's what we're thinking:

#1 - Upstairs Bathroom - Our upstairs bathroom is, frankly, a hot mess.  This will be a complete gut job (which I guess doesn't sound all that "small scale", but in comparison to taking on the entire main floor all at once, it really does)

Photobucket
 
Let me take you on a tour inside to show you why this little room needs to be a total gut job. 
 

Paint is falling off the ceiling...

Photobucket


The enamel has worn off of the original 93 year old tub so that, even after a cleaning, it still looks like this...

Photobucket
Can't believe I'm showing this

The window is gone.  It's just the storm window left.  I can't believe we've gone three years without a proper window in there.  And that we used a garbage bag as window treatment haha.  That was supposed to have been a temporary fix.  Back in 2009.  Woops! 

Photobucket

The sink is falling off the wall...

Photobucket


The medicine cabinet looks more like a druggie's stash-zone.  Which is actually probably exactly what it was once upon a time. 

Photobucket
Yes, that truly is the inside of our medicine cabinet. 

The floor is a mish-mash of vinyl tiles and just plain gone in other spots. 


Photobucket


The door jamb is messed

Photobucket


The door itself also looks like it's been broken down a time or two.  Which makes me sad because, other than our exterior door, it's the only original door in the house.  We will either have to fix it up or find another purpose for it because since the bathroom is so teeny tiny (just short of being 6x6) it just ends up getting in the way and I dream of having a pocket door in there when all is said and done.

Photobucket
 
And worst of all, the mold.  You know those health-threatening spores?  They're growing on our walls!  I think the people who sold us the house simply painted over it and now it's coming back through, but the no-ventilation in there mixed with hot showers probably doesn't help the situation much. 

Photobucket

We're also considering adding another foot or two from the neighbouring bedroom.  But the dilemma is that that bedroom is already pretty small (9x10), so taking from it would mean turning it into potentially an 8x9 room. 

#2 - Upstairs Floors - Now this one is less of a "goal" and more of a wish.  Ever since we moved in we've wanted to fix those things up, but the main floor needed more attention and now that we're "done" down here (I say that loosely because we still need to do many finishing touches, like window trim, patching holes, toe kicks under the cabinets...) I can more realistically daydream about the upstairs.  I have always wanted to refinish the stairs and Darryl has always wanted to replace them.  I have always been against that because I want to keep as much of the original charm of our house as possible.  Until now.  Perhaps it's because of the staircase makeover that I dread to imagine any more time sanding wood, or perhaps it's because Darryl is probably right.  The floors have already been sanded down a time or two and there's isn't much left for us.  Also, the back bedroom used to be a kitchen and the floors have been absolutely destroyed in there...

Darryl says he looks defeated in this picture.  I say with floors like this, how could he not!


Mhmm, really and truly this is what our poor upstairs floors look like.  It's an awful shame.


So while it is unlikely that we will be able to replace the upstairs floor in this upcoming year, it is still something I will wish floor for.

When all is said and done, I hope that this time next year our upstairs bathroom is d-o-n-e.

What are your goals for this new year?


Monday, 23 January 2012

Sand Dunes

Hi friends!  I hope you all enjoyed your weekend, don't they just fly by way too quickly??

I had a nice weekend, it was unexpectedly productive actually, and I may or may not have got my hands on a bit of a big project...


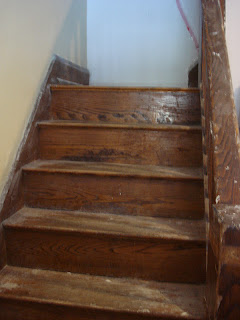
Do you have a part of your house that you constantly apologize about when guests come over?  Our stair case is that for me.  The grunge and grime (a lot of surface mess was from our demo, but I also know how they were before the demo and they were not much prettier then) is enough to make my mum tiptoe up the stairs to the washroom, just barely touching the railing with her finger tips - I see you mum!  Since the minute we walked around this house I could envision refinishing these stairs with beautiful white risers and a darker stain on the treads and it just brightening and opening up the entire entryway.  And something just got into me this weekend and I jumped in with both feet!

At some point someone had carpeted over these gorgeous (maybe not yet, but I know they will be!) stairs.  Darryl's doll of a sister came over on both Saturday and Sunday and we started ripping out all the nails and staples that were left in after the carpet had been removed, and using nail punches to sink some in that had loosened up over the years...

Eeeeeewwwaaaaa!

So after a good 10 hours of work, a ridiculous amount of sawdust, and blisters developing as proof of our hard work, let's take another peak at how it's looking...


This is only after the first run with 60 grit sandpaper (fyi, using a 40 grit may have sped the process up but I had a bunch of donated sandpaper and was nervous to try the 40).  So I have to go over it all again with a mid-grade paper and then again with a fine finish. 

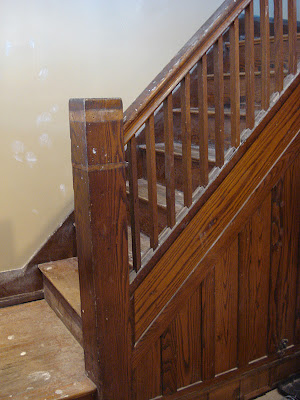
And I definitely haven't even tackled the spindles and entire side part of the stairs!

(Thoughts on whether we should stain the side panel or paint it white?  It's got such beautiful grain, but it is really heavy/dark in our tiny entryway...)

So this is only the beginning but I can't even wait to see how it all turns out!  These stairs will gross me out no more!

Total Cost so far: $28 for sandpaper

Did you get in over your boots on a project this weekend?  Have you refinished your own stairs....any tips???


Thursday, 10 November 2011

Kitchen - Befores

Well it's high time we started to take a look at the other half of the main floor renos we've been undergoing - the kitchen!  Just a reminder that these kitchen posts are so not in real time!  We started these renovations just about a year ago now so please don't think we're some kind of reno freaks, finishing an entire kitchen in the week it will take me to walk you through it!

So for today we'll take a look at how the kitchen was the first time we ever walked through it. 


Drawers missing, vent covers on countertops, doors falling off hinges, drawers with bottoms that would fall out...

The next time we went around, they had done a little painting to brighten things up and they had done their best to fix a few things


Just those few fixes alone made things seem less daunting...but we knew that this poor room was still screaming for an update.  Inside the lower cupboards the lath and plaster had been removed to get to some plumbing, but had not been patched up.  Soon after we moved in we realize this was a rodent highway!

Here's a view from another angle.  (The first views you saw above were looking from the back of the house towards the front).  Now here's a view from what you would have seen coming in through the front door, looking towards the back of the house.


That little puzzle of entryways and bulkheads had been built in when the house was converted to a duplex, they house the plumbing and wiring up to the second floor kitchen overhead.

The flooring actually photographs quite nicely in these pictures.  It's a very cheap laminate flooring that was not installed properly - the entrance to the front hallway and off to the living room had at least a 1-2 inch drop in floor height and no transition (which led to many a stumped toe!).  It also meant that if ever you ran into the kitchen excitedly, the floor would slide beneath your feet - which was of particular concern when passing the stairs down to the basement!


That yummy green colour had even been worn off from years of use. 

Despite all this, when we moved into our house, I loved that kitchen, if for no other reason than that it was ours.  It was cozy, quaint, and ours.  I'm not much of a cook yet, so the ancient stove and mini bar fridge we lived out of for a good while didn't bother me too much.  I loved this kitchen.  But I'm pretty sure I'm going to love our new kitchen even more.  Because not only is it ours, but because from top to bottom, side to side, every last square inch has been put together by our very own hands.  And for that we are extremely proud.

Tomorrow we'll take a look at demo!!

Have you undergone a kitchen renovation?  Or do you have future plans to?  How did you cook, clean and store food while under construction??


Wednesday, 19 October 2011

To Replace or Not to Replace...

This was an ongoing question for many months.  Initially our intention was to sand and restain the floors to bring them back to life.  Who in their right mind would get rid of original, decent hardwood right?  The floors in the living/L-shaped dining room  were alright.  Sure they'd been scuffed up, scratched, dulled and a little warped, but no biggie right?


 Well once we were in full on demo mode, where walls were all down, the full bathroom was removed, we could see what the floors underneath were like.  Or rather, that there weren't any floors there at all...


The above is a picture of where the opening between the living and dining room once was.  You may remember seeing it like this during demo (the part furthest to the right is where a wall once stood and once we ripped the frame out, we were left with what you see in the above picture)


The door in the above picture was not an original fixture, it was once a solid wall.  The door was put in to convert the dining room into a bedroom.  When they opened that part of the wall up, they were obviously left with a gap in the floor like we were.  However unlike us, they decided to patch it in a really shabby way...


And then once we took the tub and flooring out of the bathroom, we saw that the previous owners thought it would be a good idea to cut all of the floor out in order to put icky vinyl flooring in instead.


Then there were a few other random holes like this one, where an old heating register/vent thing was in the middle of the house which = inefficient heating. 


And it's a little hard to see in that picture, but the kitchen side of the house and the living/dining side were two different heights.  We knew that if we put in new flooring we'd have to put a new subfloor in, which would raise the floor to be almost flush with the kitchen side.  So many factors to consider and in the end we decided to put new flooring in.  Not everyone's choice I know, and one that I struggled with, they hold so much history.  But the scale of the project was beyond what I think we could do.  The floors upstairs are better and I hope we can refinish them.
Pop back tomorrow to see the beginnings of the floor changes!

Have you had to replace old floors?  Did it break your heart too??  Or were you able to refinish your old ones (if so any tips/advice is appreciated as we hope to tackle that in the future)?