Thursday, 22 November 2012

Seating Plans

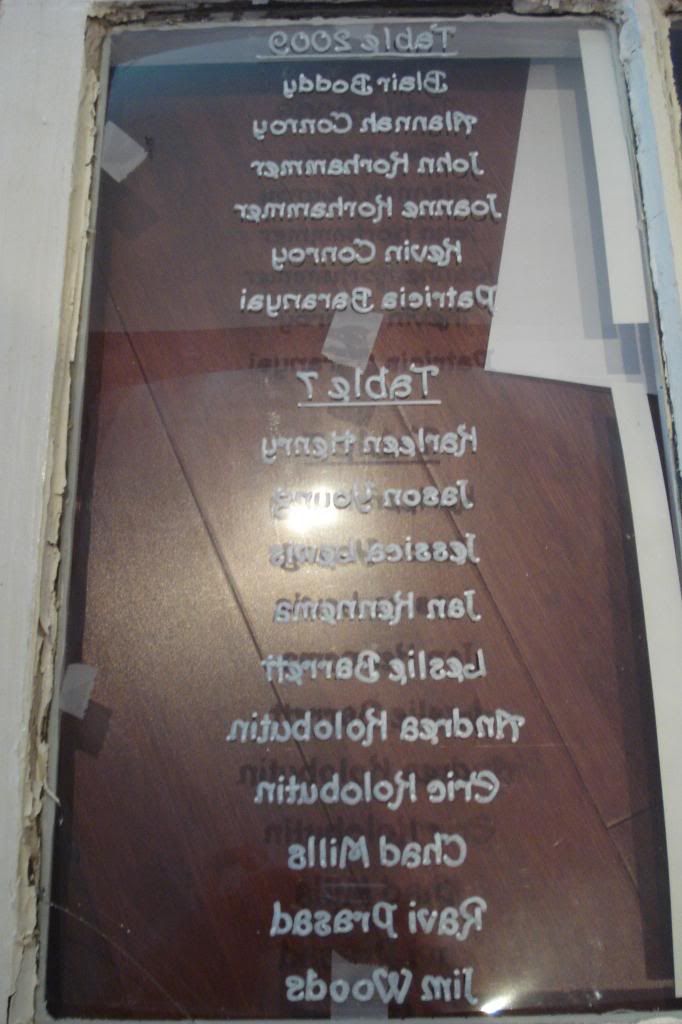
In the summer I showed you our seating guide inspiration.  We loved the idea of using our house's 92 year old original windows that we replaced.  This house means a lot to us, we've put a lot of our own blood, sweat and tears into it, it's the walls that house our own new family, it's the third member of our family!  So bringing a part of it into our wedding was only natural.
 
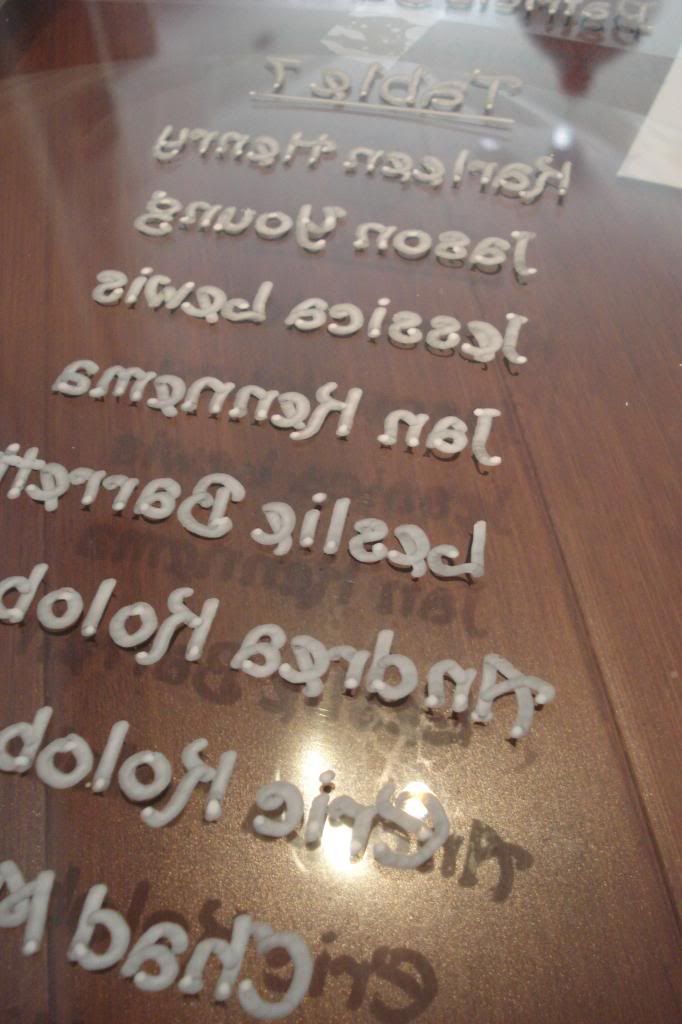
My original plan wasn't much of a plan at all, I was just going to write and erase as needed, but I can sometimes have a bit of a perfectionist streak, and having uneven, crooked writing would have driven me nuts.  So thank goodness a family friend (hi Susan!) asked if I was planning on printing a template out to trace.  Hello!  How did I not think of that!?  I blame it on the million other wedding things that were on the brain.  So after I found a font I liked, my mum printed our guest list out on overhead sheets and I taped them to the front of the windows.
 
Photobucket
 
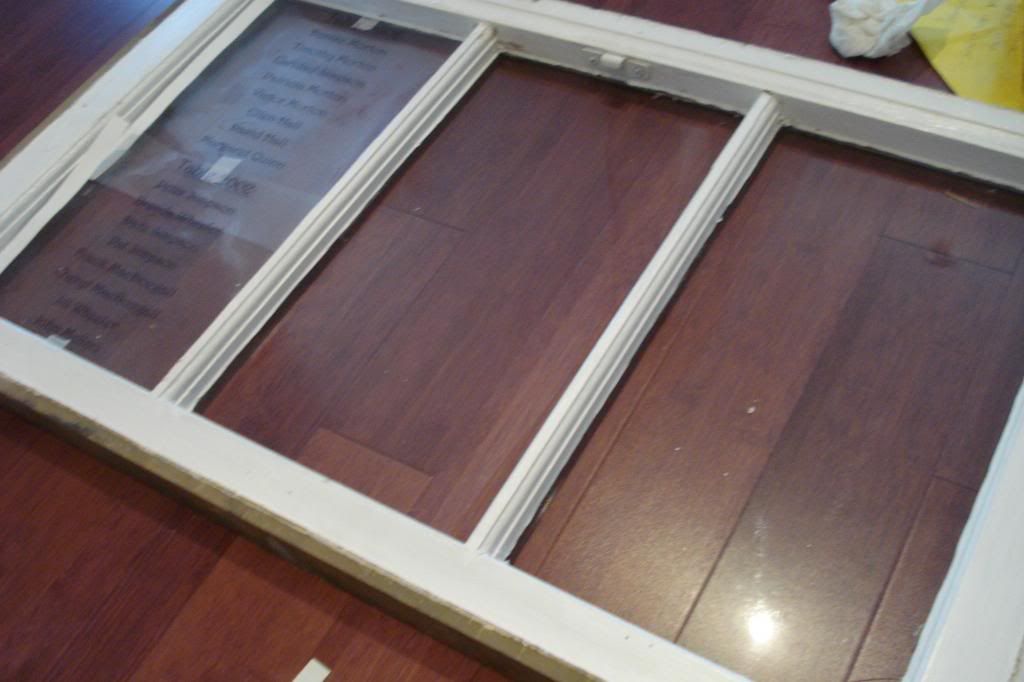
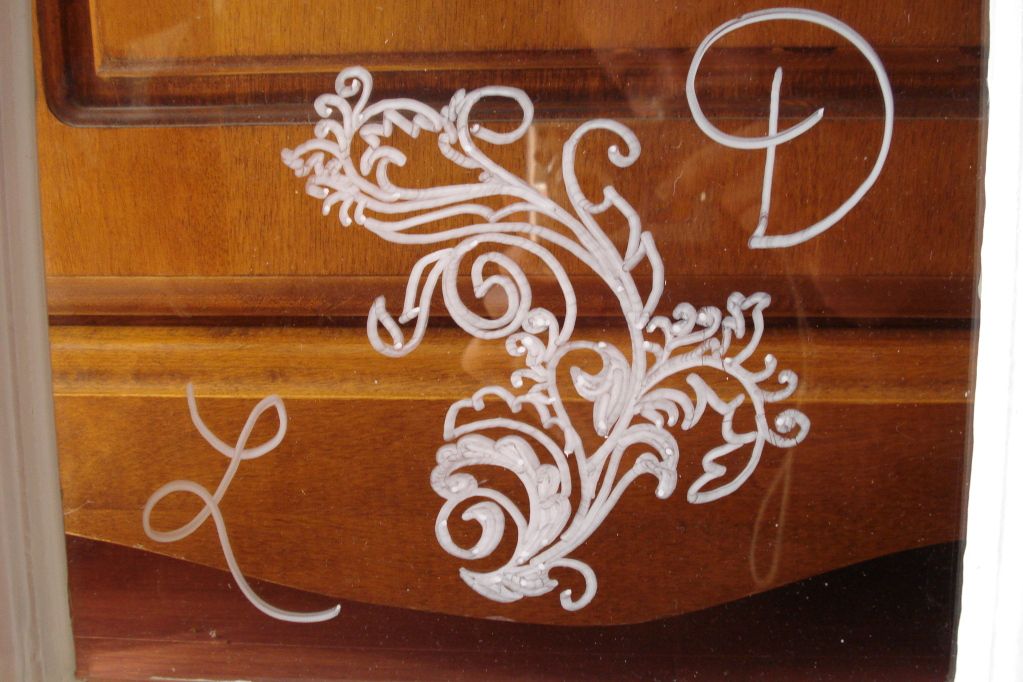
The reason I wanted the printout on overheads was so that I could tape the sheets to the front of the window, flip them over and write on the back of the window (so that, once the windows were on display, the writing would not get smudged, scratched or wiped off because the writing was behind.  Make sense?)
 
Photobucket
 
Tracing a font made my life so much easier!
 
Photobucket
 
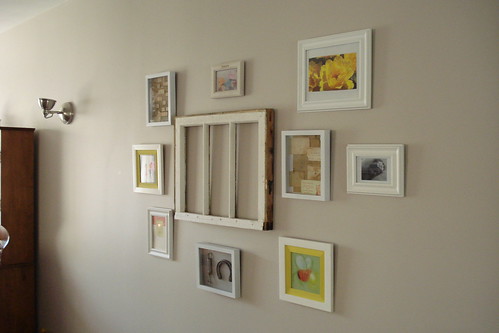
I don't have a picture of them set up at the wedding unfortunately but here they are all done and in our house!  There were two windows in the end. 
 
DSC04445_zpsf4b3882a
 
 
Photobucket
 
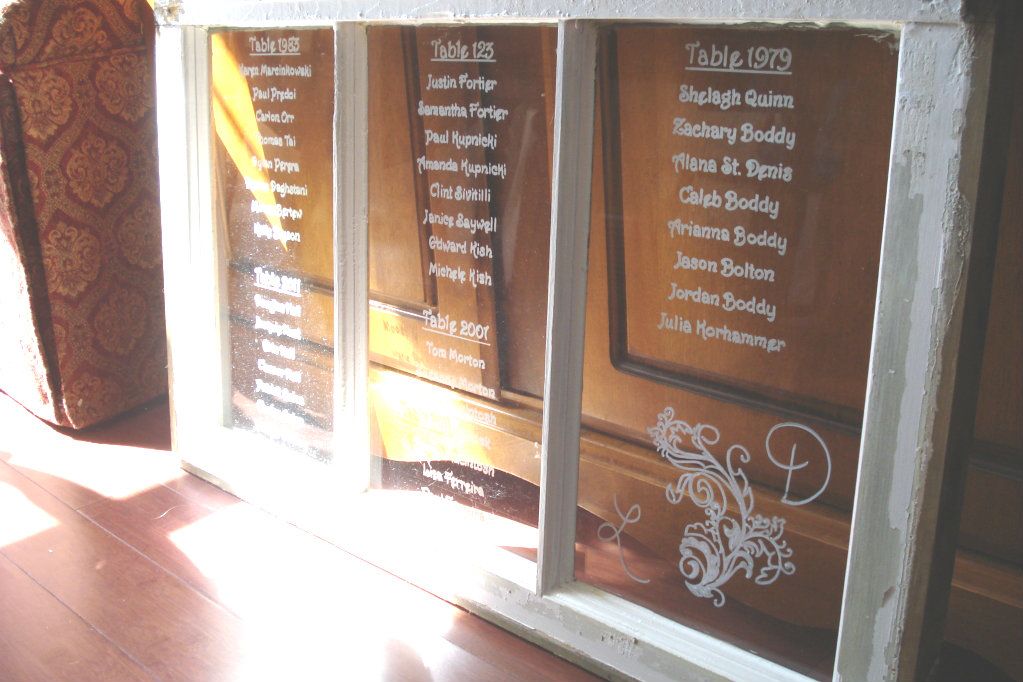
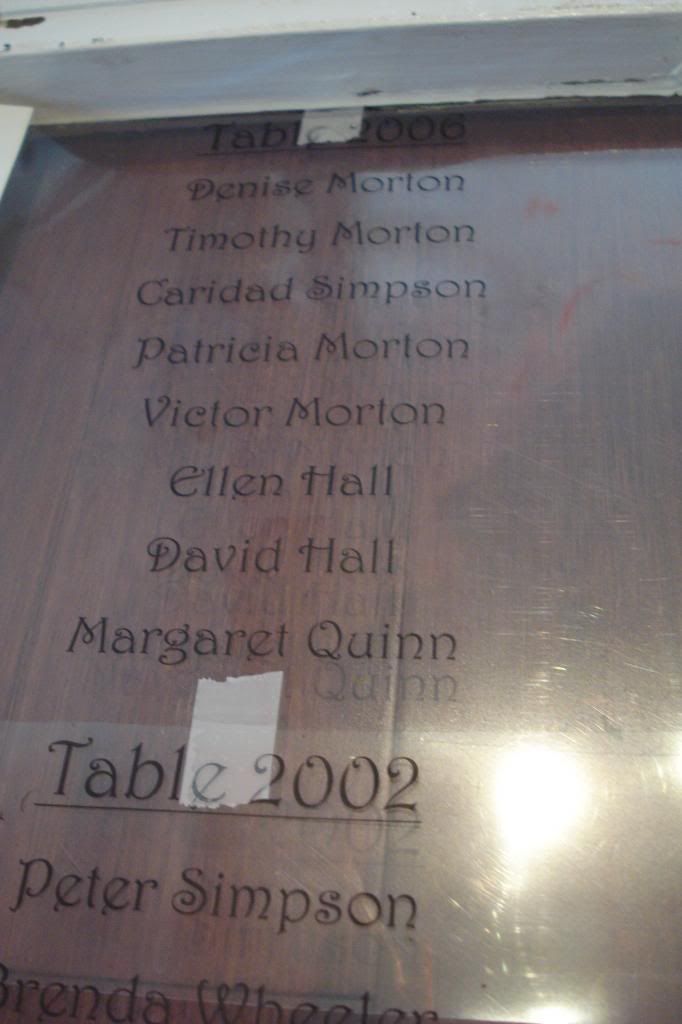
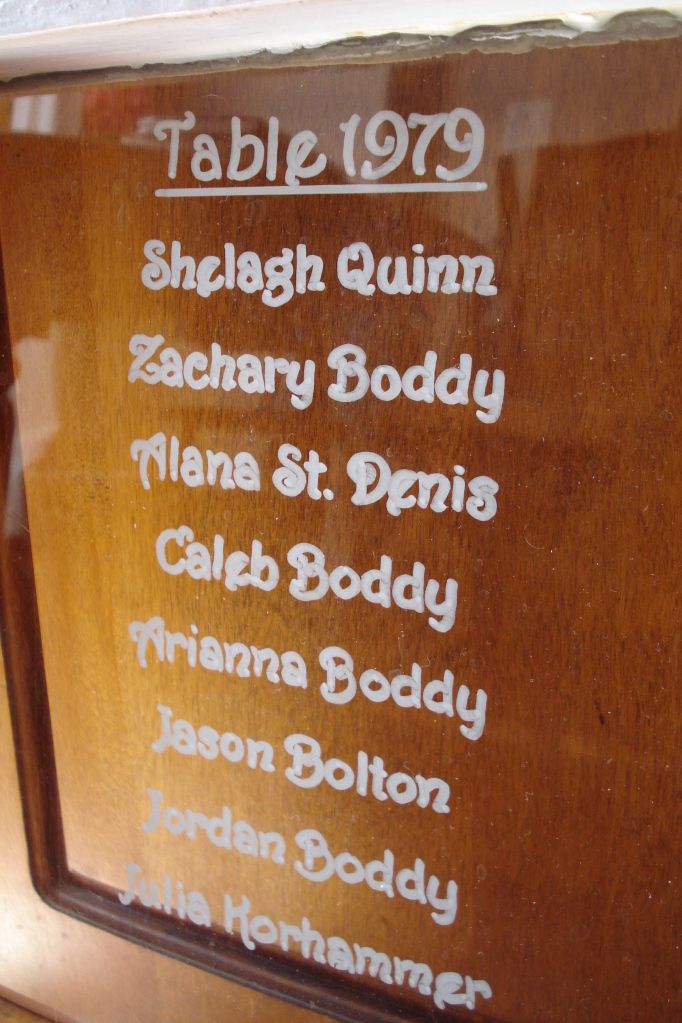
I wanted a font that wasn't too stuffy or formal because that's not really us, and wasn't the feel we were going for.  Just something nice with a little personality.  We made our table numbers, years, dates and numbers that were significant in our relationship (like our anniversary date, the year we started dating, the year we went away together, the year we spent in two different countries...)
 
Photobucket
 
 
Then during the wedding dinner, instead of clinking glasses to get us to kiss, guests were welcomed to guess the significance of their table's number (the DJ also said they could sing us a love song which some of them also did)
 
Photobucket


Right now these are sitting on the floor in our dining room, but eventually we'll get them hung up on our walls for some personalized wall art.  I just have to find the right spot, which I think I may already have, but we'll also have to make sure we don't tear any plaster down in the process - those windows are heavy, yo!

Thursday, 15 November 2012

Card Box Reveal

So I realize I've dropped the ball on post-wedding stuff (sorry, Susan!!) and part of the reason for that was because I was waiting for our pictures to get to us, but there weren't pictures of my diys at the wedding, so I'll just show you the ones that I had taken before the wedding.
 
Three months ago I shared with you the card box inspiration I had been eyeing.  I mentioned that I had come across a grey AND yellow suitcase at Value Village for $3.99.  What are the chances!?  There was a bigger size that I was going to get, but I'm glad that Darryl put his two cents in...the bigger one would have been too much.
 

Photobucket
 
The inside had a nice sunny yellow...fun!
 
Photobucket
 
I painted some wooden letters to spell "cards" in white
 
Photobucket

Then cut some burlap triangles and hung them on a scrap piece of fabric I had.

Photobucket


Photobucket
 
Then I decorated the interior with my left-over brooches and some doilies, just cause they're cute and tied in with my brooch bouquet.
 
Photobucket
 
The grey ribbon was an extra from our invitations

Photobucket

So many pretty brooches, but I had just run out of room in my bouquet...and I knew I wanted to decorate the card box with some too, so it all worked out well in the end. 

Photobucket
 

Photobucket


Photobucket

I kept the doilies in place with pins, with little yellow tips

Photobucket

And we topped it off with Darryl's favourite picture of us, from the early years of our relationship, camping with our first joint purchase (a $4 one-man tent from a garage sale, we paid two dollars each.  It was a big moment for us lol)

Photobucket


Photobucket

So while I didn't catch any pictures of it all set up for the wedding, a few days later we snuggled in to open and read our cards.  It was fun, we tried to guess who each card was from(based on the writing on the envelop, the style of the card and it's placement in the pile of other cards lol) before looking inside.  It was a fun way to draw the process out and make it last a little longer. 

Photobucket
 
So there you go!  That's how our card box turned out - sorry it took so long to post!

Monday, 12 November 2012

2012 Costume

Hello there! It's been about a month since I've posted anything. What can I say...not much has been going on house-wise, I was in a bit of an adjustment period at work that left me exhausted every night and I've felt a lack of inspiration and drive lately.

But, onwards and upwards!
 
Obviously, this is extremely late, but I just wanted to throw a quick post on here so that I can take a look back next year when I'm scrambling for a costume idea.
 
I've had this idea doggy eared in a magazine for a couple of years now and finally had a reason to make it:
 
Pinned Image
 
 
Our staff was having a costume contest but I didn't have much time to devote to it, so I got out my glue gun, a bunch of spiders I had in my Halloween bin and bought some nude nylons...
 
Photobucket
I was trying to get both the spiders on my leg and on my shoulder into this picture, hence the uber-pose.
 
Photobucket
I had more spiders crawling up my arm, but many fell off on my way home from work as I put my coat on.
 
Photobucket
 
So fun, easy, quick and cheap!
 
The original cockroach version is creepy, but just too close to home for me after a year of being terrorized by them while living abroad for a year, so I opted for spiders instead.
 
I have a couple other posts that I've been working on that are also long overdue, so I will be back in a couple of days!
 

Monday, 15 October 2012

Looking Boo-tiful

Hello!  I hope you've had an enjoyable weekend.  I attended a low key bachelorette party where we went for mani/pedis, thai food and then made a time capsule for the bride and groom to open on their 5th anniversary.  The day was wonderful.  The drive home was scary.  The rainfall was very heavy, I hydroplaned a couple of times, my antilock breaks went on when I stopped, one of my headlights was out (I was driving home at midnight for about an hour and a half long drive), the fog in some of the areas was so thick I had to pull over, stop, and talk myself into going a little further.  I was very glad to finally pull into my driveway and get out of the car! 

On sunday, I went for a little family walk with my sister, brother-in-law and baby Lily, watched a movie and then actually cooked a decent meal from scratch (a rare occurance for me, but something got into me and I felt inspired to create!  lol)

Anyhoo, I'm not much of a seasonal decorator - Holidays, yes! - but seasons, not really.  I appreciate all the lovely pictures I see of beautiful Fall decorations, but I don't have the drive to do it myself.  But when the holidays come, I love to do a little something to get in the spirit.

Last weekend I got out my Halloween bin and put a few things together.  I used the the decorations I got on clearance last year at Michaels and got the living room set up.


Photobucket
 
The feathers are from a centerpiece at a wedding we were at last year, the hurricane was a wedding gift and the glass stones I normally have in there with a white candle.  So I put in the black candle, the orange tea light holder, the ceramic skull and scattered some little spiders around.
 

Photobucket
 
I love classic orange and black for Halloween, so my orange vase and some more black feathers went well together

Photobucket
 
And then the doily spider webs I made last year, I hung from the curtain rods.

Photobucket

I put a few things up outside, but nothing to write home about, so if I add a few more I'll snap some pictures.

Are you getting your Halloween decorations out?  Do you like seasonal or holiday decorating?

Friday, 5 October 2012

Adding to the Gallery Wall


We recently added a couple of frames to our gallery wall.  I'm short on time so let's just get to it, here it was before...
 
DSC04113
 
 
 I had two more things I wanted to add to our wall, but felt the need to wait until after we were married to hang them.  So after our wedding we added two more frames on the left side ...
 
 
Photobucket
 
 
But seeing as the sunshine is whiting the pictures out, here's a close up.  One is of one of my favourite engagement pictures where it shows both of our families officially joining as one...


Photobucket


 The second one I had seen at 29 Rue House and thought they were absolutely adorable...little personalized periodic table of elements art!  So once we were married I just had to do one up for us.
 

Photobucket
 
And that's that.  Super quick post!  I love these two new additions and am already looking for a few more things to add to the wall.
 
I wish you all a wonderful Thanksgiving weekend, enjoy your long weekend if your work gives you one, enjoy time with loved ones and filling your bellies!


Wednesday, 3 October 2012

Link Up


I'm still here!  It's been very busy around here, but I'll be back shortly with a few updates...for now I'm linking up with Thrifty Decor Chick for the October Before and After Party.


TDC Before and After

Monday, 24 September 2012

DIY Pillow Covers

I hope you all had a great weekend!  It's been quiet over here because I got a new contract job for the year last week and have been working some long hours while I get settled.  It was a well-needed weekend and now I'm all rested and ready to go for week two.

I have been putting these pillow covers off for at least nine months.  I don't know why I was able to sew these stuffed turtles with no problems at all, but when it came to sewing a basic rectangular pillow cover, I froze.  My problem was getting the measurements right.  I read some where to take the length and width of the pillow but I thought for sure that wouldn't allow for the puffiness of the pillow, so I ended up adding inches on for that and came out with a massive pillow cover and a whole lot of frustration.  So I hid it all away upstairs for almost a year. 

From time to time I'd think of these fabric samples from about a year ago that I had envisioned as nice little throw pillows on our couch but would quickly dismiss my thoughts. 

Finally, two weekends ago I got sick enough of my poor excuses and pulled my sewing machine and materials out again.

Photobucket
 
Once I decided to igmore my stubborn thoughts that all the pillow cover makers before me surely must have been missing something, I listened to what their many many tutorials told me and took the basic pillow measurements and got to sewing. 
 
I am not about to make a tutorial on here because lord knows these are far from perfect and I had zero meathod to my madness and just a whole lot of trial and error.  So here they are all finished up and cozying up to our couch.

Photobucket


Photobucket
 
Despite their rocky start I am quite pleased with how they turned out.  I backed them all with a simple white fabric to be sure that I would have enough for all four pillows.

Photobucket
 
Darryl had been gone for the day and was pleasantly surprised to come home to some new pillows

Photobucket


What did you guys get up to this weekend?  Sew yourself any pillows?