Here's what we started off with...
It was fully functional, no dings, absolutely nothing wrong with it. It just wasn't so much our style sooo...
We decided on a paint colour (who knew there were so many confusing shades of white!) They all look the same in the above picture, but some were a bit too pinky and the others were either too bluish or too yellowy. Eventually we settled on the perfect white for us, then we got to lightly sanding the furniture so that the paint would stick to it.
We started with primer and then gave it its first coat of the white paint. Sorry about the pictures, these were taken a year and a half ago, long before I realized they'd have an audience. I'll have to take more care in future photo shoots!
Next Darryl went down to the dungeon basement and started making cuts for the trim we wanted to add on the doors and along the base...
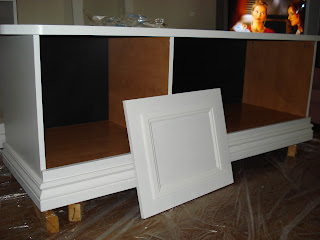
Here he is adding the trim (I swear I did more than just take the pictures haha)
So we added baseboards along the bottom of each piece, to make it feel a little more custom and fancy. I opted out of painting the inside, mainly because I thought the inside would get beat up and scratched too easily (this was before I discovered urethane to protect the paint...duh)
See there I am, hard at work lol. There's paint on my hands as evidence!
Hahaha, Darryl got a little too close to the paint. We added littler trim to the doors to add some depth...
After we'd given the furniture a couple coats of paint we had to decide on a couple of knobs we had picked out, and their placement on the doors. Here were the main contenders...
Originally I liked the glass knobs in the centre, but Darryl said it made the doors look too juvenile and symmetrical and now I totally agree, so before I give you the full "after" shot, here's a reminder of what we started with...And after (don't pay attention to the mess around it, just the unit itself lol)...
Another before...
And how it ended up...
We're pretty happy with the transformation and love how it looks. It all went so smoothly and easily that I found myself searching the house for other things I could get my hands on. When Darryl's cousins who gave us this furniture came over, they asked if we got new furniture, not noticing that it was what they had given us! It was so exciting being able to tell them what we did with it.
Our smaller DIYs have been put on hold since we decided to DIY our main floor (I'll start sharing that with you next week!) but I am just itching to get another creative project in, I have so much inspiration flooding my mind!
How was your first furniture DIY experience? Do you have any projects lined up that you're itching to start?


Linds, this is fantastic! I love how you added the trim to the doors! It really makes it look like a completely different piece!!
ReplyDeleteOur first furniture DIY was the dresser that is now in Halle's nursery. We originally did it red... the turquoise is definitely a lot prettier! :)
Hey there - I just discovered your blog through First Time Fancy. This is an amazing transformation - it's hard to believe it's the same piece! Nice work!
ReplyDeleteKerry, I absolutely love the colour you guys did Halle's dresser, it is just perfect! Can't wait to get my hands on another furniture DIY!
ReplyDeleteHey Amelia, thanks! I'm really excited to start something else now!
ReplyDeleteThat looks amazing!! I love how trim makes it look sooo different. You guys did a great job (and I need a new media stand...hmmmmmmm)
ReplyDeleteThanks :) The trim definitely was key for this I think...some food for thought maybe??
ReplyDeleteWow - what a transformation! It really looks fantastic. I'm enjoying reading through your blog - just found it today :)
ReplyDeleteHi Janet, thanks for taking a peek around, I'm off to browse your blog!
ReplyDeleteGreat job!
ReplyDelete