Friday, 18 November 2011

No Sew Christmas Tree Skirt!

So last weekend I decided to make one of my pinterest loves a reality.  Christmas pins are abundant and my boards are no exception.  My mind has been on Christmas for a good week or two now so I was itching to get crafty.

I saw this lovely, ruffly, tree skirt at My Crazy Life and thought it was so fun.  She has a link to another tutorial on her blog which shows how to cut the base into an even circle, if you're looking to try something similar out but don't have an old skirt to sacrifice.


Then I saw this gorgeous skirt over at The Johnston's and absolutely loved the combo of fabric and burlap!


Other than their uber cuteness, the reason I loved these skirts even more was because there was NO SEWING invovled!!  I don't know how to sew, nor do I own a sewing machine so this was key.

I decided to save some moola by reusing a tree skirt I already had, but didn't love (I had seen a few tutorials where you can make the base out of drop cloth but decided against it since I already had something at home)

She's a beaut!

Instead of ripping all the Santas, snowmen and snowflakes off (to ensure an even application) I decided to just flip it over and use the other side.  I gathered my materials (fabric, burlap, glue gun, glue - I used 21 mini sticks! - scissors and a measuring tape)


I'll give you the run down on how I did mine, but the two links above have awesome tutorials so I recommend checking them out too.


After flipping the old skirt over I grabbed my strips of fabric and burlap (I think in the end I ended up using 8-9 strips of both fabrics and each strip was 2-3 meters long.  I cut each strip to be 3 inches wide.  I did all the cutting the night before while watching one of my go-to feel-good movies - "My Date With Drew" if you're curious).

I would put about an inch or two strip of glue and attach the fabric.  To make the ruffles I pinched a piece of fabric, like so...


...then sneak a dab of glue behind the pinched part and stick it down...


The fabric layers were great, not a problem...the burlap layers however...more of a challenge.  The link I put at the beginning has a better way for working with the burlap, I didn't have any pins laying around though, so my fingers took the brunt of it.  I developed a system though.  Since the burlap has holes in it, the glue obviously seeps through onto your fingers when you push it down onto the felt skirt.  My genius (and highly unrecommended) system went a little like this.

1.  Sacrfice your fingers to burn on first contact
2.  Resist the urge to peel burning glue off fingertips
3.  Allow to dry. 
4.  You now have a layer of protection and will no longer get burned

Perhaps a picture will better explain how, after the initial burn, my fingers were completely protected.  Here's how they looked after an entire row of burlap...


Again, I would not recommend this, but it gave a nice layer of protection between the hot glue and my fingers!

But back to the skirt...


The old tree skirt had velcro on the back to attach the two ends together, so when I flipped it over to use the back side, the velcro was now visible.  Not to worry though, an easy fix - I cut the velcro off and just glued it on the side that would not be seen.  Easy Peasy!

Budget Breakdown

Tree Skirt Base - free
Mini Glue sticks - 18 for $4 at Michaels (used a 40% off coupon)
2 meters of fabric - marked down from $12/meter to $4/meter = $8 total
1 pack of burlap 1m x 3m - $5 at Home Depot

$17 total

While shopping around for tree skirts over the last 2 years I've learned that nice tree skirts are quite pricey so a $17 total made me happy!

Have a great weekend!  Any fun plans??

Has Christmas been on your mind yet?  Have you bought any new decor or done any crafts?  Are you pinning like crazy??


Thursday, 17 November 2011

Guest Posting At Life Begins at Thirty, Right?

Today I'm guest posting for Janice over at Life Begins at Thirty, Right? I love her blog, she's just finished a major bathroom reno that turned out gorgeous!!  So welcome to any new readers visiting from Janice's blog, take a peek around, I'd love to hear from you!

Tomorrow I'll share my little Christmas pinterest craft that I got up to on the weekend!

Wednesday, 16 November 2011

Kitchen Demo Wrap Up

On Friday I started to show you the demo in the kitchen and this is the last bit here...

We used to enter the main floor bathroom from the kitchen...


Here's the same view, but demoed


Although we had opened the bathroom up, we knew we were going to close it up again where the wall originally closed (in the first picture the wall that the toilet is up against would have continued to the left for a closed wall.  But they opened it up to include a shower)

So once the demo was done, we Darryl built the new partial wall up.  This would eventually be the wall that our fridge would be housed in.


That view is looking from the dining room into the kitchen.  You can kind of see that there's a bit of a bump out where the heating ducts are on the dining room side.  We had to update the heating to be more efficient - the old heating vents were only in the center of the house which is not how it's done anymore.  You can also see in that picture that there is no longer a bathroom at all at the back of the house.  Here's a hint as to where we're moving it to...


So next week we'll take a look at the kitchen being put back together, starting with some floors!  And in not too long we'll look at the bathroom as well!


Tuesday, 15 November 2011

Lions 'n Tigers 'n Baby Bears, Oh My!

My sister was ahead of the game!  In my haste I had forgotten to take a picture of my bear after I bit into it, but she later told me that she had taken pics of her making them!  So, as this blog is also a way for me to record and remember important moments in my life, I wanted to include her pictures of how she made the wee cuties!


She bought the Teddy Bear moulds and chocolate from Bulk Barn.  She used 4 different colours of chocolate - dark choc, milk choc, yellow and pink).  Once the chocos were melted down (in a double boiler so that the chocos don't burn, she used a paint brush for the finer parts like painting the bows yellow.


The eyes, nose and paws were painted with the dark chocolate.  Next she filled the bear moulds about half way, put some sticks in and then snuck a bit of that beautiful pink in there!


Finally she topped the moulds up to hide the pink and then wrapped them up just like a real treat!


I love that throughout their pregnancy they've shared all the news in special, unique ways!

Tomorrow we'll be back to having a look at kitchen fun!

Monday, 14 November 2011

The Results Are In!!!!!!

Last Friday my sister and brother-in-law found out the sex of their babyyyyyyyyy!!!!!  I can barely contain myself!!  From the very start I was convinced it would be a girl, but then for whatever reason after their first ultrasound I thought, no it's definitely a boy.  So on Friday we all decided to write down our final guesses so that no one could go back on their picks.  At the last moment I went back to my gut and wrote down "girl".  It was a complete tie, 3 of us thought girl and 3 thought boy.

To make it even more fun, they thought of a special and yummy way to tell us the good news.  My sister made these cute little chocolate bears with either a filling of blue or pink inside...


...so that when we bit into them, all would be revealed!!!  I wish I had a picture of the filling, but I was just oh-so-excited and I gobbled it all down while shrieking and screaming in excitement. 

.
.
.
.
.
.
.
.
.
.
.
.


IT'S A GIRL!!!!!!!!!!!!!!!

I'm going to be an aunt and I'm going to have a little niece!!  This is such an exciting, fun and amazing time for our family.  For my parents and I, it's the first grandchild/niece so it makes it extra special.  I'm loving the journey of it all so don't hate if I post from time to time about it!  My pinterest is about to go baby shower crazy!

I hope you all had a great weekend!  I got a little DIY Christmas project done yesterday which I'll share with you later this week!


Friday, 11 November 2011

Let the Walls Come Down!

Alright - back to demo!  Yesterday I showed you what our kitchen looked like when we first saw it and then what it looked like when we moved in


So after close to a year of living in our house, we finally took the hammers and crow bars to the kitchen for a mega face lift

We started by taking all the doors off of the cabinets and then removing the counter tops


And once the cabinets were removed, we started tackling the plaster and then the lath.  Here's me standing in the same spot as the above picture


From where my hands are and down, the walls had some crazy kind of super human wire mesh imbedded into the plaster which made it so much more dfficult to demo.  At points it was a full on tug-of-war between us and the house trying to rip those walls off. 


So we took all the easy stuff off first and then tackled the mess mesh.

Upon ripping the ceilings down we found nearly a century's worth of spider sacs.....hello heebie jeebies!!!


And yes that is some knob and tube wiring in there too.  It had been disconnected and re-wired in 2004 but obviously no one tore walls and ceilings down to pull the old stuff out....so we did!  It's all gone now.  So are the sacs.

Remember this wall where we uncovered the original entrance (the red lines) that had been covered up?


Here's us uncovering the same entrance from the kitchen side of the wall...


hahahahah I love this picture and I'm sorry Darryl, this is the only picture I had of the entrance!  He cracks me up...let me explain, because at this point he didn't know that huge hunk of film was even on his back (hence the picture!) 

The window on the left used to be in the bathroom and they had put this window film on for privacy.  When we removed the bathroom, we peeled the film off the window and tossed it somewhere. 


Somehow it ended up on Darryl's back, neither of us could figure out how.  So I'm the meany who, before telling him, started cracking up, he's trying to figure out why I'm laughing so hard that I can't talk, I grab my camera and snap away!  It just struck me as so funny because he was going around, business as usual, tearing out walls, demoing a house, chatting with me, not knowing that this huge piece of plastic was attached to him. 

And why I love him even more...


...when I finally showed him why I was laughing, he just flew ran with it.  And yes, for the record that is a dollar store soldier's helmet he happened to come across and couldn't resist the urge to wear.  How can we not have fun working together when I am constantly entertained by this guy?

Anyhoo, back to the kitchen!

So here's the door that Superman took down, now we could see through to the living room


Look at all that dust!  We're still sweeping that stuff up over a year later.  Just when you think you've tackled it all, you catch a dust ball bunny in your peripheral vision and quietly curse under your breath. 

I'm going to leave it there for today and finish up on Monday I think.  Have a wonderful weekend!

Any fun plans or projects for you guys this weekend??


Thursday, 10 November 2011

Kitchen - Befores

Well it's high time we started to take a look at the other half of the main floor renos we've been undergoing - the kitchen!  Just a reminder that these kitchen posts are so not in real time!  We started these renovations just about a year ago now so please don't think we're some kind of reno freaks, finishing an entire kitchen in the week it will take me to walk you through it!

So for today we'll take a look at how the kitchen was the first time we ever walked through it. 


Drawers missing, vent covers on countertops, doors falling off hinges, drawers with bottoms that would fall out...

The next time we went around, they had done a little painting to brighten things up and they had done their best to fix a few things


Just those few fixes alone made things seem less daunting...but we knew that this poor room was still screaming for an update.  Inside the lower cupboards the lath and plaster had been removed to get to some plumbing, but had not been patched up.  Soon after we moved in we realize this was a rodent highway!

Here's a view from another angle.  (The first views you saw above were looking from the back of the house towards the front).  Now here's a view from what you would have seen coming in through the front door, looking towards the back of the house.


That little puzzle of entryways and bulkheads had been built in when the house was converted to a duplex, they house the plumbing and wiring up to the second floor kitchen overhead.

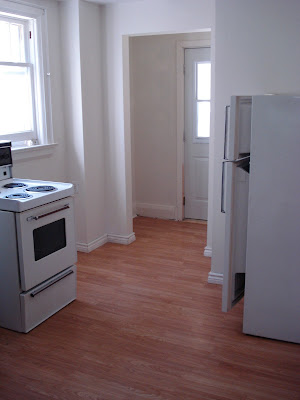
The flooring actually photographs quite nicely in these pictures.  It's a very cheap laminate flooring that was not installed properly - the entrance to the front hallway and off to the living room had at least a 1-2 inch drop in floor height and no transition (which led to many a stumped toe!).  It also meant that if ever you ran into the kitchen excitedly, the floor would slide beneath your feet - which was of particular concern when passing the stairs down to the basement!


That yummy green colour had even been worn off from years of use. 

Despite all this, when we moved into our house, I loved that kitchen, if for no other reason than that it was ours.  It was cozy, quaint, and ours.  I'm not much of a cook yet, so the ancient stove and mini bar fridge we lived out of for a good while didn't bother me too much.  I loved this kitchen.  But I'm pretty sure I'm going to love our new kitchen even more.  Because not only is it ours, but because from top to bottom, side to side, every last square inch has been put together by our very own hands.  And for that we are extremely proud.

Tomorrow we'll take a look at demo!!

Have you undergone a kitchen renovation?  Or do you have future plans to?  How did you cook, clean and store food while under construction??